Pages

Showing posts with label diy projects. Show all posts

Thursday, June 28, 2012

Chalkboard Mason Jars!


Okay, so I've made my book labels, given my chalkboard a face-lift, and now, I'm on to my next project: chalkboard mason jars!  This is a super cute and EASY project that I can't wait to take back to school.


Here's your supply list:
-Glass Mason Jars (I used 2 different kinds and sizes.  You can pick these up at grocery stores, garage sales, or even in a 12 pack on Amazon!)
-Blue Painter's Tape
-Small-ish Paint Brush
-AND, of course, Chalkboard Paint! 


Yes, I will admit, I have become a bit intrigued...no no, more like obsessed...with chalkboard paint lately...but look, I've now found COLOR chalkboard paint on Amazon:


So, the first step, just like with the chalkboard upcycling, is to clean your surface.  I snagged my jars at a garage sale, so they were a bit dusty.  I soaked them in some hot, soapy water and gave them a good scrub.  Then, I let them air dry for a few hours.

Next, tape off the area that you would like your paint to go in!  You will see that one of my larger jars has the paint ALL the way around, and the smaller one just has a square.  It's totally up to you!
My smaller jar, taped off.

Now, take your brush and put on your first coat.  As a quick little tip, chalkboard paint is water based and does clean up easily IF you don't leave it.  Another way to help with easy clean up (and a trick I've learned) is to wet your brush FIRST before you use it!  This helps the paint not seep INTO the bristles and make cleaning it out harder.  :)

Okay, after your first coat, LET IT DRY!  I made the mistake of putting on my 2nd coat too quickly, and it just caused my first coat to get all goopy and gross (so I had to take it off and start over!)  When I restarted, I let my 1st coat dry a good few hours before reapplying.  Eventually, I ended up putting 2 coats of the pink on and 3 coats of the black.  I guess it just depends on the paint and how thick you're painting the coats on!

When your paint is finally done, remove your tape, and hopefully you'll have "clean" edges!  (Don't worry if you had some paint leak under the tape...you can just scrape it off with a razor or sharp knife!) 
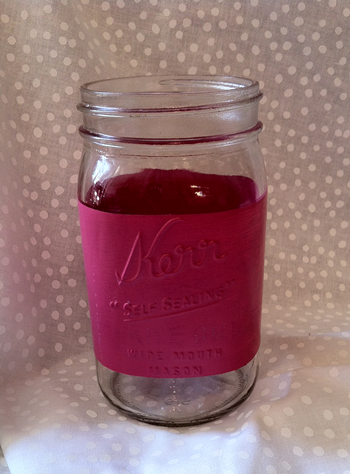


For a fun finished look, add some ribbons!  After much debating, I decided on a brown to compliment my pink jar:


AND, here's the best part!  It's "self-sticking"!  The cute fabric ribbon has tape on the back, which made this whole process EVEN easier!  (As a side note, I did order this ribbon in a few different colors from Mindy Mae's Market, a SUPER whimsical site with great prices!  Check it out!)  I just cut 2 equal sized pieces, peeled off the back, and wrapped it around:


Just had to show you the other colors I bought from Mindy Mae's!  Haha, I LOVE that site!

I also added striped ribbon to my handled jar.  As a tip, that I had to learn the hard way, be aware of the handles!  I didn't even think about them as I started my ribbon, but once I got to them, I had a bit of an "uh-oh"...but I don't think anyone will even notice!  BUT, just be aware as you're painting and such!  Plan ahead!  :)

So there you have it!  A chalkboard mason jar, that you can label, store things, and even relabel as you organize throughout the year.  I have so many ideas to use these for, besides "pens" haha!  Think about it...lunch count...behavior jars...rewards...picking random students' sticks....craft supplies...sharp/dull pencils...the list goes on and on!


Didn't I tell you it was easy!  And oh so practical!  And, did I mention, it's fun?!  :) 
 
You can check out this DIY and LOTS more over at the "Monday Made-It" Linky:


Enjoy!!!!

Wednesday, June 20, 2012

November Learning Intermission-- An "Upcycled" Craft!


I'm taking a quick intermission from all my serious "techy" November Learning knowledge to share with you my quick D.I.Y. Summer Project #2- an "upcycled" chalkboard!

How many times do we see super cheap (or even FREE) older chalkboards at garage sales, thrift stores, or even lying out in the hallways from other teachers?!  But, I'll have to admit, most times they do look pretty "crusty".  (Haha, I just HAD to interject that word...one of my teammates uses it ALL the time, and it always cracks me up!)  So, anyways, why buy a new one (and send the old one to the landfull!) when you can "upcycle"!!!

Here's how!  For this project, you will need:

-1 old, "crusty" chalkboard  (any size)
-felt (any color)
-ribbon (any color)
-hot glue gun
-chalkboard paint (I prefer mine in a spray can...you can get it on Amazon.)


Okay, so now that you have all your supplies, you can begin!  My old chalkboard started out like this:


Now, on to the process!

STEP ONE:  Clean your board really well.  I used a damp paper towel, then went back over it again with Windex.  Don't forget all the edges, because you may want to paint that, too! 

STEP TWO:  Set up a workspace to spraypaint in!  I lay down papers in my garage and put up anything important I don't want "overspray" on. 

STEP THREE:  Lay down your board and put your first coat of paint on!  Here's what my "step three" looks like:


STEP FOUR:  Let your first coat dry and apply a 2nd coat.  Let this dry completely and see how it looks.  You may need a 3rd coat, depending on how sad your board was before.  :)

STEP FIVE:  Let all your paint dry overnight.  Yes, I know the can says "dries in 30 minutes!" buuut its better to be safe than sorry!

STEP SIX:  Plug in your glue gun, and glue your ribbon around the edges of your board.  Don't worry about the corners being perfect, because we will cover those up later on!


STEP SEVEN:  Create some felt flowers, and glue them on the corners!  Don't throw away your scraps, because you can even make some cute, baby flowers to go on there, too!


STEP EIGHT:  Hang and enjoy! :)

Don't you just adore it?  And what a quick and easy project!  I can't wait to hang mine up to use!

*UPDATE:  I've added this fun D.I.Y. to sweet Tara's "Monday Made-It" Linky Party (even though it's Wednesday...)!  Click on over to her blog to see TONS more fun ideas to make!  :)


I'll be back tomorrow with more "high-tech" learning tid-bits from my workshop last week.  But until then, Happy Wednesday! 

Thursday, June 14, 2012

Summer Project #1- Book Labels!


For most of us, it's safe to say that summer has officially begun.  I have had 2 weeks off, been to a few workshops, and had lots of time to catch up on all those pesky little chores and things that we don't get to during the school year (i.e. dentist, doctors, returning purchases that have been forgotten about, and so on and so forth!).

Now, though, it's time for all those fun projects I've been dreaming about in my head for the past few months!  And of course, I'd LOVE to share my work with YOU!

So here goes-- Project #1: "This Book Belongs To..." Labels

I don't know about you all, but I have SO many random books in my classroom library.  And believe me, I'm NOT complaining!  I LOVE having such a wide assortment for my kiddos to choose from.  My only problem, though, is that they come from so many random places.  Most of my books are second-hand & used, so most of the time, they have someone else's name written in them.  :(

BUT, that's no problem for me, once I get going!  My solution, you may ask?  Making my own sticky labels to cover up other names and to put my name on!  Get's 2 birds with one stone!  :)

So here's a quick little break down of my project from the past few days:

Supply List:
  1. Color Printer
  2. Full Page Shipping Labels (I used Staples' "White Shipping Labels", compatible with Avery #5165)
  3. ek Tools "Flourish Square Large Punch" (item #54-30077.  I purchased mine from Michael's)
Now, I created a few different, fun templates in Word to print out!
 

So, now, here are the "official" directions:

Step 1- Fill in name on each label.
Step 2- PRACTICE PRACTICE PRACTICE!  I can't tell you how many "test sheets" i printed out to make sure that all the sizing was correct and the words were exactly where I wanted them!  (And, as a side note, I sent the file to my teammate, and when she printed it, things were a little bit "off", too!  So it just shows you that every computer and printer are different!)
Step 3-  Practice punching!  I flipped the punch over, so I could see exactly what I was punching out.  It took me a few tries to get it perfectly punched and to learn how the punch works!

Step 4- Now, I loaded the labels and printed one sheet at a time.
Step 5- I punched out the labels...CAREFULLY! :)


Step 6- I just peeled and stuck them in my books!  Easy as pie!  :)


Now, just comes the part of sticking them into all my books!  I'm probably going to have to budget a few hours this summer to go up to school and stick away!  Maybe I can even "con" a few friends to help out one evening.........hmm.......

Okay, ready for the BEST part of it all?  I feel SO guilty for not posting in such a long time, and so guilty for not having any GIVEAWAYS in such a long time, that I'm going to have a big one NOW! 

**Want to win a free copy of these "This Book Belongs To..." Labels to make your own labels like mine?  Here's an EASY, FREE WIN for the first 3 followers:  Simply leave a comment below telling me how you're spending your summer!  Any projects for next school year?  Or are you just resting and relaxing?  I'd love to hear about it!  Leave your email address, and I will send you a free copy of this file!  But hurry!  It's only for the first 3 followers who comment!

Happy Thursday!  Can't wait to post again soon.  (I went to a 2 day Alan November workshop earlier this week, and I've got such great info to share!)

P.S.- I want to give a BIG shout-out to Rebekah, who sent me such a SWEET note through Kontactr while I was writing this post.  It TOTALLY made my day, and gave me such inspiration to keep sharing my ideas with you all!  :)