Pages

Thursday, June 28, 2012

Chalkboard Mason Jars!


Okay, so I've made my book labels, given my chalkboard a face-lift, and now, I'm on to my next project: chalkboard mason jars!  This is a super cute and EASY project that I can't wait to take back to school.


Here's your supply list:
-Glass Mason Jars (I used 2 different kinds and sizes.  You can pick these up at grocery stores, garage sales, or even in a 12 pack on Amazon!)
-Blue Painter's Tape
-Small-ish Paint Brush
-AND, of course, Chalkboard Paint! 


Yes, I will admit, I have become a bit intrigued...no no, more like obsessed...with chalkboard paint lately...but look, I've now found COLOR chalkboard paint on Amazon:


So, the first step, just like with the chalkboard upcycling, is to clean your surface.  I snagged my jars at a garage sale, so they were a bit dusty.  I soaked them in some hot, soapy water and gave them a good scrub.  Then, I let them air dry for a few hours.

Next, tape off the area that you would like your paint to go in!  You will see that one of my larger jars has the paint ALL the way around, and the smaller one just has a square.  It's totally up to you!
My smaller jar, taped off.

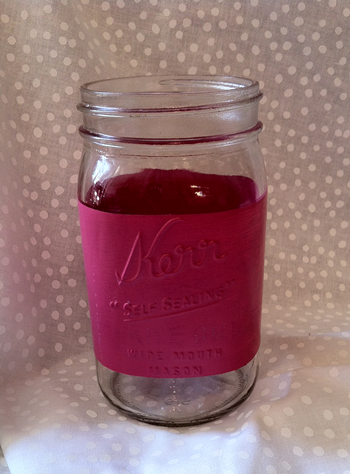
Now, take your brush and put on your first coat.  As a quick little tip, chalkboard paint is water based and does clean up easily IF you don't leave it.  Another way to help with easy clean up (and a trick I've learned) is to wet your brush FIRST before you use it!  This helps the paint not seep INTO the bristles and make cleaning it out harder.  :)

Okay, after your first coat, LET IT DRY!  I made the mistake of putting on my 2nd coat too quickly, and it just caused my first coat to get all goopy and gross (so I had to take it off and start over!)  When I restarted, I let my 1st coat dry a good few hours before reapplying.  Eventually, I ended up putting 2 coats of the pink on and 3 coats of the black.  I guess it just depends on the paint and how thick you're painting the coats on!

When your paint is finally done, remove your tape, and hopefully you'll have "clean" edges!  (Don't worry if you had some paint leak under the tape...you can just scrape it off with a razor or sharp knife!) 


For a fun finished look, add some ribbons!  After much debating, I decided on a brown to compliment my pink jar:


AND, here's the best part!  It's "self-sticking"!  The cute fabric ribbon has tape on the back, which made this whole process EVEN easier!  (As a side note, I did order this ribbon in a few different colors from Mindy Mae's Market, a SUPER whimsical site with great prices!  Check it out!)  I just cut 2 equal sized pieces, peeled off the back, and wrapped it around:


Just had to show you the other colors I bought from Mindy Mae's!  Haha, I LOVE that site!

I also added striped ribbon to my handled jar.  As a tip, that I had to learn the hard way, be aware of the handles!  I didn't even think about them as I started my ribbon, but once I got to them, I had a bit of an "uh-oh"...but I don't think anyone will even notice!  BUT, just be aware as you're painting and such!  Plan ahead!  :)

So there you have it!  A chalkboard mason jar, that you can label, store things, and even relabel as you organize throughout the year.  I have so many ideas to use these for, besides "pens" haha!  Think about it...lunch count...behavior jars...rewards...picking random students' sticks....craft supplies...sharp/dull pencils...the list goes on and on!


Didn't I tell you it was easy!  And oh so practical!  And, did I mention, it's fun?!  :) 
 
You can check out this DIY and LOTS more over at the "Monday Made-It" Linky:


Enjoy!!!!

Wednesday, June 27, 2012

Alan November Workshop Taught Me About ONLINE TUTORIALS!


ONLINE TUTORIALS!!!  Wait, why is that in all caps, you may ask?  Because, I'm SO excited to share these with you!

Let me first back track and appologize for just now posting this.  My plans were to create this post earlier LAST week, HOWEVER, for this amazing new tool, I did need a microphone for my computer.  (Which, I thought I had one, but after digging and digging, it was no where to be found!)  So, I ended up getting a cheap one from a cheap store, but it is just an "old school" mic that you would use with a PA system or if you were performing in a band . . .
                                a little like this   -------------->

What I WOULD suggest (and I'm going to ask my principal if we have $20 to spare) would be a mic that sits on the desk, so you don't have to waste a hand to hold the mic.  That was one of my biggest struggles while recording, and I especially for children, it may be difficult.  This is what I have in mind (that hopefully would be MUCH easier):


Okay, now that my rant is over, let me let YOU listen to this brand new online tutorial ABOUT online tutorials, using a new (to me) program, Jing!


Pretty neat, huh?  I'm very excited to share this with my kiddos next year.  I think these tutorials can be GREAT for all levels of students.  Here's how:

  • It will provide enrichment to your higher level students.  They can create tutorials about current topics and subjects in class.  After all, they say you don't really TRULY understand something unless you can teach it yourself!   

  • It will provide opportunities for lower level students to hear another student's perspective on things.  They may have an "aha" moment after listening to Bobby or Jody teach them from the video. 

  • It will provide yet another techology "outlet" for your students to explore and learn with!  (After all, like I mentioned in an earlier post, our students will be reading and learning more on the internet than from school and/or books in their lifetimes!) 

  • It creates a "stage" for students in our classrooms!  No longer are students simply creating work for the teacher's eyes only (because let's face it, that's normally what we expect...our students to do their best work on something for only our eyes to see, grade, and give back).  Now, though, students will be accountable for something even bigger!  Children can ultimately share their work with the whole world (depending on how private and/or public you set the videos)!  Through online tutorials, we can "create creators", and every classroom can be an auditorium-- because now your students will know that eyes other than YOURS will see their hard work and creativity!

So, go play around with it!  Try it out, experiment over the summer, and get comfortable with it!  I'll have to admit, I'm still learning LOTS about it, but my goal is to be a PRO at it by the end of the summer, so I'll be ready to use it with my kiddos once the new school year begins.  (I'm envisioning LOTS of video topics, not just math!)

Here are a few links to some websites that have examples of online tutorials that we can use in the classroom:
  • Mathtrain TV: The site I showed in my Jing video above.  Real tutorials made by kids!
  • Khan Academy:  A site I've mentioned before, has many many video tutorials for ALL levels.  Sal Khan creates and records all videos.
  • Always Learning:  Has a great article of her students online tutorial project.
  • And I'm sure there are LOTS LOTS more, if we just search!
Okay, so I'm wondering now that you've made it through...what are your thoughts?  Like it?  Used it before?  Seen it before?  Have any other similar things?  Please share with the rest of us!  I know I, for one, would love to hear it!  Happy "Hump Day"!

Tuesday, June 26, 2012

Goodbye Kontactr!

As much as I have used Kontactr to receive feedback over these last few blogging months, it has had its MAJOR downfalls...including (but not limited to) not always receiving messages, receiving messages with no email addresses or contact info in them (because it is a "one-way" service), and so on and so forth....

All of which, have lead me to decide to take Kontactr off of my blog.  Whew.  Yes, it in fact, has taken me a good 3-4 weeks of going back in forth in my head to come to a decision...but, alas, there it is!

SO, moral of the short post:  if you have come to my blog and are looking for my Kontactr form, it no longer exists!  Simply send me an email at my Yahoo account instead!

Thanks, and Happy Tuesday.

P.S.  I really do have one last neat "techy" post from my November Learning Workshop to share.  I just don't have one last little supply yet to complete it....but I will share soon....(GET EXCITED!!)  :)

Wednesday, June 20, 2012

November Learning Intermission-- An "Upcycled" Craft!


I'm taking a quick intermission from all my serious "techy" November Learning knowledge to share with you my quick D.I.Y. Summer Project #2- an "upcycled" chalkboard!

How many times do we see super cheap (or even FREE) older chalkboards at garage sales, thrift stores, or even lying out in the hallways from other teachers?!  But, I'll have to admit, most times they do look pretty "crusty".  (Haha, I just HAD to interject that word...one of my teammates uses it ALL the time, and it always cracks me up!)  So, anyways, why buy a new one (and send the old one to the landfull!) when you can "upcycle"!!!

Here's how!  For this project, you will need:

-1 old, "crusty" chalkboard  (any size)
-felt (any color)
-ribbon (any color)
-hot glue gun
-chalkboard paint (I prefer mine in a spray can...you can get it on Amazon.)


Okay, so now that you have all your supplies, you can begin!  My old chalkboard started out like this:


Now, on to the process!

STEP ONE:  Clean your board really well.  I used a damp paper towel, then went back over it again with Windex.  Don't forget all the edges, because you may want to paint that, too! 

STEP TWO:  Set up a workspace to spraypaint in!  I lay down papers in my garage and put up anything important I don't want "overspray" on. 

STEP THREE:  Lay down your board and put your first coat of paint on!  Here's what my "step three" looks like:


STEP FOUR:  Let your first coat dry and apply a 2nd coat.  Let this dry completely and see how it looks.  You may need a 3rd coat, depending on how sad your board was before.  :)

STEP FIVE:  Let all your paint dry overnight.  Yes, I know the can says "dries in 30 minutes!" buuut its better to be safe than sorry!

STEP SIX:  Plug in your glue gun, and glue your ribbon around the edges of your board.  Don't worry about the corners being perfect, because we will cover those up later on!


STEP SEVEN:  Create some felt flowers, and glue them on the corners!  Don't throw away your scraps, because you can even make some cute, baby flowers to go on there, too!


STEP EIGHT:  Hang and enjoy! :)

Don't you just adore it?  And what a quick and easy project!  I can't wait to hang mine up to use!

*UPDATE:  I've added this fun D.I.Y. to sweet Tara's "Monday Made-It" Linky Party (even though it's Wednesday...)!  Click on over to her blog to see TONS more fun ideas to make!  :)


I'll be back tomorrow with more "high-tech" learning tid-bits from my workshop last week.  But until then, Happy Wednesday! 

Sunday, June 17, 2012

Alan November Workshop: Part 3 of ?


Do you know how to Google?  Yes, yes, I’m sure all of you are thinking, “Yeah, all you have to do is go to Google and type in what you want.  Duh.” 

Well that’s what I thought, too!  Dear, sweet Jennifer Beine over at my November Learning workshop definitely changed my mind, though!  (AND, changed my mind on how to TEACH my kiddos to “search” the web!) 

So here are a few, quick, “did ya know”s:

1. There is an operator in Google.  Yes, just like for phones.  The Google operator can aid in all of your searches!  Just type “site:” and it will help pull up the most relevant sites.  Pretty neat.

2. There are Country Codes for the internet.  I never knew that!  So, any site outside of the U.S. has a 2 letter code.  For example, England’s is “uk”.  Furthering that example, if you needed help locating schools in England, you could use the Google operator and search “site: sch.uk”.  This will pull up VERY different sites than if you just “googled” “schools in England”.  Very cool.


Okay, okay.  Now you’re probably thinking what this has to do with teaching elementary school.  (To tell you the truth, after my initial amazement with these things, I was wondering that, too!)  Well, here’s the deal!  Just like I posted earlier about teaching our kiddos critical thinking skills on the internet, we also need to teach our students HOW TO SEARCH online!  I’m sure if we asked, most of our students (even the young ‘uns) would say they knew how to “google” something.  BUT, the chances of them getting the EXACT info the want/need the first time is probably pretty slim!  (And I know you and I are good at “skimming” the blurbs on Google to see if that’s the site we need, but I know my students are not!)

So, again, dear sweet Jennifer Beine shared some neat tools with me that I’d love to share with you!  (By the way, if you click on over to her site, she has LOTS of info there that is SO helpful and informative to teachers!)

-First thing she shared is the Google Advanced Search.  I’m somewhat ashamed, but I’ll admit, I’ve never really used it before this past week.  After playing around with it, though, I can see HOW helpful it can be to our older students.  Keyword, though…OLDER.  I doubt my 2nd graders could make good use out of this site, but who knows…maybe after lots of whole group practice and modeling, they will at least be aware of it!

-So, if the Google Advanced Search is too much, here is MY newest favorite thing to try with my class next year: Boolify! Boolify.org is a kid friendly search site (YES!  FOR ELEMENTARY LEVEL KIDS!  YAY!).  It is interactive and colorful—so what’s NOT to like about it!  Students can pull the puzzle pieces over from the left, and the site with prompt them with a question.  THEN, as each puzzle piece is added, the results pull up on the bottom of the page! 


It automatically changes the results as students’ searches become more specific, so it’s very user-friendly, too!   When you have time, go play around on it, because it’s definitely something I could see using in 2nd grade during our Research Project Unit!

-Not impressed with Google Advanced nor Bolify (or want another fun site to try out)?  Try NoodleTools!  It is a step-by-step questionnaire that helps kiddos know WHERE to START searching.  (It may be another site that takes whole group instruction and lots of modeling, though.)  I could see it being useful for older students, with time and practice!  It gives a few options of sites to help you search after you fill out the questions on what TYPE of info you’re looking for.  Definitely a different approach than anything I’ve ever done!

So, it’s clear to see that there are plenty of other options to help us search the internet.  And, just like how I shared that we need to teach our students how to “read” the internet, we also need to teach our students how to “search” the internet—because a good search can take half the work out of having to determine if information is legit or not (or even what we NEED!).  I’ll admit, I’m guilty of speed searching…typing into Google something quick, hastily scanning the results to see if it’s what I need, and if not, retyping and trying again.  Repeat, repeat, repeat.  But, why do all that if we can narrow it down to search correctly the first time?  This is definitely something I need to teach both MYSELF and my students!

Saturday, June 16, 2012

Alan November Workshop: Part 2 of ?


Hi all!  Happy Saturday!  I hope everyone is enjoying their weekends so far. 

I can't believe the positive response I got to my 1st Alan November post (both comments and emails, too!).  I'm so excited that there are others out there that get excited about technology, just like me!  (Actually makes me feel like less of a nerd!)

Today IS Saturday, though, so my "Part 2" post will be short and sweet (for both of us).  It goes along with part of my post yesterday: teaching students to think critically online. 

Have you ever been online and come to a "dead" link?  Click on it and you get "page not found" or "page no longer exists"?  I'm sure we ALL have had that happen!  And sometimes it can be quite maddening! 

Well let it frustrate you NO LONGER!  Mr. November introduced me to the "Way Back Machine" over at archive.org.  All you have to do is enter the web address of the site you would like, and it will go find it for you.  It has recorded almost all sites since the beginning of time (not really, but maybe the beginning of the internet?).  It will show you when the site was created, when ANY changes were made, and even when it was taken down (if it had been).  It will also show you screen shots of the page on any/all of those days!  So you can see what it looked like the last time you visited the page!  How neat is that!

(Screenshot of TpT on Way Back Machine.  Shows when it was created, then I can click on any blue date to see what TpT looked like then!  Also shows the "activity" on the timeline up top!)

You might ask, "What does this have to do with teaching our students to think critically about the internet?"  And to that, I will reply, "We're building our detective skills!"  Yes, by using a site like this, it helps us add a bit more information when trying to determine if a link is legit or not!  It also helps us find things that no long "exist" online (even though they may be quite helpful)! 

So, I know it's a short post, but go play around when/if you have time and see what you think.  I thought it was a super neat site!  I can't wait to use it and/or explain it to my kiddos next year.  Even though they're 2nd graders, the more exposure they get earlier on, the more likely it is to "sink in" during the later years!  (Right?!)  :)

Keep coming back tomorrow (and next week!).  I've got more info to share from my November Learning Workshop and many tidbits for you to use in the classroom!  (Can't wait and need some "sneak peeks"?  Well, how do you feel about Google Apps/Tools, teacher AND student created online tutorials, student blogging, and other helpful links & online tools?)

Friday, June 15, 2012

Alan November Workshop: Part 1 of ?


Back in May, I was blessed to be asked to attend a 2 day Alan November Workshop this summer.  I eagerly accepted, because I have heard SUCH amazing things (both from teachers at my school and outside the district)!  The incredible things they learned really intrigued me (you know me and my technology!), and as always, I want to know more about…well…pretty much everything! Haha!
 
I will admit, when Tuesday rolled around, I wasn’t quite excited to get out of bed earlier than I had been the past week (it’s funny how quickly we get into summer mode).  But, I did wake up, wash my hair, put on make-up (and a happy face) and off I went to day one of my workshop.
 
OMG.  Let me just stop right now and tell you how thankful I am that I got to attend!  I learned SOSOSOSO much, and I can’t wait to get started on some of it, and of course, I can’t wait to share some of my newly acquired info with YOU ALL!  There is SO much, though, that I am going to break it up into a few chunks, partly so you won’t get bored of reading, and partly so I won’t get carpal tunnel from typing a novel about it!  :)
 
So, on to “Chunk One” of Alan November Learning:

Alan November's Keynote-

Alan November opened the whole 2 day workshop with a fun (and FUNNY) keynote.  It’s hilarious when you first see him, you think he’s going to be a techy nerdy man who is dry and boooring.  BUUUT it’s quite opposite!  He is SO random and SO funny!  His voice CRACKS me up, and he definitely kept me on my toes and listening throughout his keynote speech! 

Mr. November in action!
Here are a few of his thoughts—I’d love for you to “ponder them” and tell me what you think:

1. Technology is about 2 things: information and communication.  When we talk about “advances” in technology, we’re really talking about advances in how we get our information or how we communicate. 

(*My thoughts…hmm…he’s totally right!  EVERY piece of technology I could come up with was for one of those 2 purposes (if not for BOTH!).  Blogger: communication AND information.  Teacher mic: communication.  Facebook: communication.  Websites: mostly information.  TVs: mostly information.  Phones: mostly communication…except when I’m looking up info on my iPhone…and the list can go on and on…)
 
2. We need to start using technology as a student directed resource.  There are so many great tools, programs, and more out there that students can use on their own to aide in their learning.  BUT, these require students directing their own learning.  No teacher “telling” students to get online and play this math game on this level for this long.  It’s about teachers letting go of some control and asking themselves, “What control am I willing to give up?”  Hanging on to all control in our classrooms is one of the biggest barriers of technology.

(*My thoughts…Guilty (partially)!  I do try to “control” the technology in my classroom.    BUT, at the same time, I do teach 2nd grade.  They definitely need some guidance.  For example, I have my “Computer Card” envelopes that allow students to get on to the computer with 2 options of sites for the day.  So, I think I KIND OF give students some choice in allowing them to choose their own direction.  I would never just let them have free range of the computers, though!  Keep in mind, this workshop was for K-12, so maybe Mr. November hasn’t worked a lot with the younger kiddos… )
 
3. Children in elementary school will be reading more on the internet than in books (throughout their lifetimes).  We need to teach children how to “read” the internet.  This includes critical thinking skills, common sense, and learning how to evaluate information online.  Mr. November then went on to share a story about a high school boy “Zach” who wrote a whole research paper claiming that the Holocaust never happened.  Research you ask?  It was all online.  Click here to see the whole story written byAlan November.  It’s short and interesting.  *There is also a great blog post on the November Learning site, here.

(*My thoughts…YES!  I do this!  Ding ding ding!  Finally, something I do correctly!  I ALWAYS tell my students to THINK about the information they’re reading.  Does is make sense?  Does it SOUND correct?  We also talk a lot during our “research report” segment about reliable sources online.  So yay for me!  Gold star for starting my kiddos early on this one!)
 
So that’s where I’m going to leave off today.  It’s a lot… I know.  But, I promise, if you’re a techy like me, and you love to share technology with your class, it’s so worth it!  I’m going to be sharing LOTS of fun tips and information over the next week or so, so please keep checking back!  I’ll try to keep them short and to the point!
 
One last thought to leave you with (courtesy of Mr. November): Yes, Texas is a standardized testing state, and that tends to have many teachers “teaching to the test”. (I know many of you all out there aren’t from Texas, but you can read on, anyways, because it still applies!)  There is no testing, though, for internet or computer skills.  These, though, are going to be a LIFELONG aptitude our students need.  So, how are YOU going to make sure your students get the technology education they need?

Thursday, June 14, 2012

Summer Project #1- Book Labels!


For most of us, it's safe to say that summer has officially begun.  I have had 2 weeks off, been to a few workshops, and had lots of time to catch up on all those pesky little chores and things that we don't get to during the school year (i.e. dentist, doctors, returning purchases that have been forgotten about, and so on and so forth!).

Now, though, it's time for all those fun projects I've been dreaming about in my head for the past few months!  And of course, I'd LOVE to share my work with YOU!

So here goes-- Project #1: "This Book Belongs To..." Labels

I don't know about you all, but I have SO many random books in my classroom library.  And believe me, I'm NOT complaining!  I LOVE having such a wide assortment for my kiddos to choose from.  My only problem, though, is that they come from so many random places.  Most of my books are second-hand & used, so most of the time, they have someone else's name written in them.  :(

BUT, that's no problem for me, once I get going!  My solution, you may ask?  Making my own sticky labels to cover up other names and to put my name on!  Get's 2 birds with one stone!  :)

So here's a quick little break down of my project from the past few days:

Supply List:
  1. Color Printer
  2. Full Page Shipping Labels (I used Staples' "White Shipping Labels", compatible with Avery #5165)
  3. ek Tools "Flourish Square Large Punch" (item #54-30077.  I purchased mine from Michael's)
Now, I created a few different, fun templates in Word to print out!
 

So, now, here are the "official" directions:

Step 1- Fill in name on each label.
Step 2- PRACTICE PRACTICE PRACTICE!  I can't tell you how many "test sheets" i printed out to make sure that all the sizing was correct and the words were exactly where I wanted them!  (And, as a side note, I sent the file to my teammate, and when she printed it, things were a little bit "off", too!  So it just shows you that every computer and printer are different!)
Step 3-  Practice punching!  I flipped the punch over, so I could see exactly what I was punching out.  It took me a few tries to get it perfectly punched and to learn how the punch works!

Step 4- Now, I loaded the labels and printed one sheet at a time.
Step 5- I punched out the labels...CAREFULLY! :)


Step 6- I just peeled and stuck them in my books!  Easy as pie!  :)


Now, just comes the part of sticking them into all my books!  I'm probably going to have to budget a few hours this summer to go up to school and stick away!  Maybe I can even "con" a few friends to help out one evening.........hmm.......

Okay, ready for the BEST part of it all?  I feel SO guilty for not posting in such a long time, and so guilty for not having any GIVEAWAYS in such a long time, that I'm going to have a big one NOW! 

**Want to win a free copy of these "This Book Belongs To..." Labels to make your own labels like mine?  Here's an EASY, FREE WIN for the first 3 followers:  Simply leave a comment below telling me how you're spending your summer!  Any projects for next school year?  Or are you just resting and relaxing?  I'd love to hear about it!  Leave your email address, and I will send you a free copy of this file!  But hurry!  It's only for the first 3 followers who comment!

Happy Thursday!  Can't wait to post again soon.  (I went to a 2 day Alan November workshop earlier this week, and I've got such great info to share!)

P.S.- I want to give a BIG shout-out to Rebekah, who sent me such a SWEET note through Kontactr while I was writing this post.  It TOTALLY made my day, and gave me such inspiration to keep sharing my ideas with you all!  :)

Sunday, June 3, 2012

Last Weeks of School!

It's hard to believe how long it's been since I've posted!  I'm sure we all know how CRAZY the last few weeks of school can be, and on top of that, one of my dear, sweet teammates had a"surprise" surgery and wasn't there the last week!  So, needless to say, it's been BUSY BUSY BUSY!

But now that I have a few moments of down time (rather a few MONTHS now!), I thought I'd finally jump back on to share some fun last week of school "moments" with you all!  Sooo, here are my "top 3" that I thought I could cram into one quick post:

1. In School "Field Trip"!
We were blessed with some extra PTA money that allowed us to bring in a company called "High Touch High Tech".  They did a GREAT rocks lesson-- "Dig It!"  Our kiddos got to "dig" for their rocks, then explore their attributes, sort them, and figure out the different types from a key.  Very fun (for both the class and me, since I got to have a few minutes of "down time" while the scientists were teaching!!)


2. Field Day!!!
I don't know when everyone else has theres, but here in Texas, by the time we have it, it is normally HOT HOT HOT!  Luckily, it was a BEAUTIFUL day, which was such a blessing, considering we had no water activities this year (due to city water restrictions....yes, I do live in Texas!)  We DID have some new, fun inflatable activites, though, and one of my teammates and I even raced up the slide and went down together :)  Fun fun!
very excited before.....
racing up...

going down...
and very disheveled afterwards!  :)

3. Popsicle Possibilities!
After Field Day, we had extra recess, a picnic lunch, and then a sleeeeeepy afternoon!  The class was SO very tired after spending all day in the sun, so we cooled off with a fun science "experiment"-- my Popsicle Possibilities!  We made a prediction of how many licks & bites it would take to eat our popsicles, then got to enjoy them!  Finally, we answered some follow-up questions and got to use our creative skills too!  I love this activity!


So there you have it, my top 3 activities from our last week of school!  I can't believe it's already over.  It truly flew by!